
I don’t generally blog about data visualisation in Power BI because it’s not my strong point, and I don’t blog about maps and geospatial analysis because I know even less about that subject and there are people like David Eldersveld who cover it so well. I do like playing around with maps though and recently I’ve been having fun with the Icon Map custom visual developed by James Dales. Probably the thing I like most about it is that so many properties accept measures as inputs, which means that you can use DAX to do some interesting things.
In this post I’ll show you a very basic example of how to display dynamically generated lines on a map – specifically, I’ll show you how to draw lines between any four cities that a user selects from a slicer. Pre-calculating all the possible combinations of cities when you load your data is not feasible because of the sheer number, so this is a scenario where being able to dynamically generate the lines between the four selected cities in DAX is really useful.
To start off, I downloaded a table with a list of cities in the UK and their latitudes and longitudes from https://simplemaps.com/data/gb-cities and then loaded this data into four identical tables in Power BI called Start, Second Stop, Third Stop and End.

I then created four slicers from the City column from these four tables, so the user can select the four different cities they want to draw lines between.
The key to making this work is to use the Icon Map visual’s ability to display geometric data in Well Known Text format; documentation on this can be found here. To achieve this I wrote some (slightly over-engineered) DAX in a measure that generates a LINESTRING object that has four lines to connect the four selected cities:
Route =
var CityTable =
{
    (SELECTEDVALUE('Start'[Longitude]),
    SELECTEDVALUE('Start'[Latitude])),
    (SELECTEDVALUE('Second Stop'[Longitude]),
    SELECTEDVALUE('Second Stop'[Latitude])),
    (SELECTEDVALUE('Third Stop'[Longitude]),
    SELECTEDVALUE('Third Stop'[Latitude])),
    (SELECTEDVALUE('End'[Longitude]),
    SELECTEDVALUE('End'[Latitude]))
}
var FilteredCityTable =
FILTER(
    CityTable,
    NOT(ISBLANK([Value1])) &&
    NOT(ISBLANK([Value2])))
return
"LINESTRING ( " &
CONCATENATEX(
    FilteredCityTable,
    [Value1] & " " &
    [Value2], ", ") &
")"
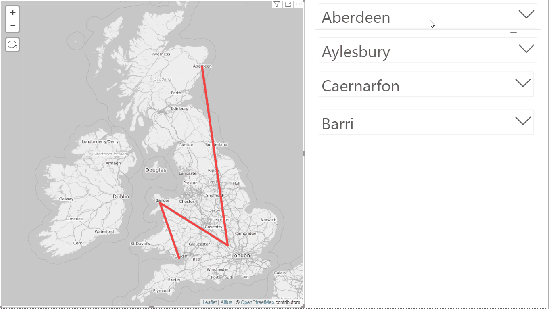
Here’s what the measure returns when the cities of Bath, Birmingham, Banbridge and Bradford are selected:
LINESTRING ( -2.365556 51.379444, -1.916667 52.466667, -6.26701 54.35091, -1.75 53.783333)
Finally, I dragged this measure in the Icon URL / WKT / SVG well in the Icon Map visual (NB: you need to use the version of the visual from http://www.icon-map.com/ and not the version from AppSource for now for this to work). Here’s the result:
You can download the sample pbix file here.
There are far more practical things you can do with this: for example, Mimoune Djouallah has a great blog post here on how to use Well Known Text in Icon Map to display 1.2 million points on a map. Let me know if you have a real-world application for this by leaving a comment.